All posts filed under: DIY

Upcycling: Fabulous chest of drawers revamp for on-trend style

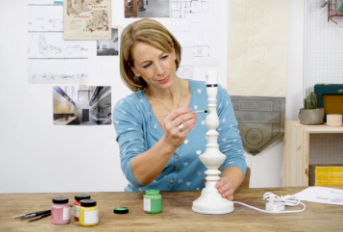
A shabby wooden chest of drawers can be transformed over a weekend turning it from garage-worthy, to something that you’ll be proud to have in your home. This was a great upcycle feature I did for the fab “Your Home” magazine (lots of projects every month) and it can be achieved with any drawer unit as long as the unit is solid wood. You could also label each drawer with the contents – different clothing items, or office sundries etc depending on where you will use the drawers. Step by step instructions are below – photos are by Lizzie Orme. Remove the handles from the drawers, and use wood filler to fill the holes –read the packaging to ensure the filler can be varnished. Check the piece for any wobbles and remedy any problems at this stage by tightening screws or using wood glue where necessary. Use an electric sander with medium grade sandpaper to remove all the dark varnish coating the piece. Don’t worry about getting a completely clean finish on the wood as some colour …

Get your kids enjoying craft

Most children are naturally creative and their imaginations allow them to turn an old box into 73 different things – just think how toddlers love to play with wrapping paper as much as the gift it enveloped. My two small people are aged 7 and 5 and one in particular has her mother’s love for sticking things, cutting things, colouring things and ideally, putting them all together to make something new. I have recently been presented with a tractor, musical instruments and animal masks and all before 7am – something that makes my heart sing (then sink somewhat wondering what chaos will greet me as the remains of her creativity!). School holidays are a great time to do a bit of craft with kids, but don’t panic if it’s not your sort of thing. You have a cup of tea and just chat to the small person as they do the messy bit. A few tips I’ve picked up along the way: 1. Cover your table. I bought a piece of oilcloth fabric (the wipe clean stuff – …

Online upcycle & craft videos – see me in action!

At the end of last year, the lovely people at Style at Home magazine asked me to make 4 videos for the Craft Corner section of their website to show you, step-by-step, how to upcycle furniture. I really enjoyed the process and it was fun to film the projects that I’ve been doing every month for the magazine for a while. I do honestly love doing up bits of old junk, or changing the use or look of something plain so to me this was a job from heaven. I’d be delighted if you have a few minutes to watch the videos – I hope you like them! There’s a folk inspired lamp which adds a fabulous pop of cheerful colour using a lampshade making kit (these are amazing – you gotta give one a go) and Annie Sloan chalk paint which sticks to anything it’s brilliant for furniture revamps. If your taste is different, follow the video using different combination of paint and fabric that suits your decor. Give a plain stool vibrant personality with paint and wrapping paper. …

DIY drilling tips – get that job done today!

Drilling holes in a wall is a necessary job for many DIY tasks and not difficult if you follow the right steps. I thought I’d post a few tips I hope you’ll find useful to make it an easier and more successful job. The most important thing before you drill into a wall is to check there aren’t any pipes or wires hidden below the surface – if you drill into these a quick DIY job could turn into a potentially dangerous nightmare. Run a wire/pipe detector (there are lots on the market but this is the one I use) over the area where you plan to drill and it will beep if there’s metal below marking a place NOT to drill. Wear safety goggles too to protect from any flying debris. Top drilling tips for general DIY jobs around the home: 1. Choose the right wall plug for your walls – use a plastic plug that will grip the wall (something like this) in solid (brick, concrete or stone) walls. You need something different for …

Room makeover – incredible DIY kitchen revamp you can do yourself

    I’ve been doing room makeovers for years, but this kitchen is still one of my favourite designs – it featured in “Your Home” magazine which has fantastic features like this every month. It’s not only a truly amazing transformation, but it’s special because almost all the changes that were made could be done by a competent DIYer, (the only  of tradesmen expense was a plumber to change the tap) so costs were kept right down. This shows what you can do without ripping the entire kitchen out and starting again – I’m a great believer that you can do masses yourself if you take your time and you’ll get such a sense of achievement when finished. This kitchen as you can see from the shot below, was dated and ugly and the family wanted something fresh and new. Although at first look you’d think it all needed to go, on closer inspection the worktops, flooring and kitchen carcasses were in good condition, and ripping them out would be expensive and pointless. To do this transformation in your own …

Beautiful vinyl floors? Yes, really!

When you mention vinyl flooring, people often have a negative reaction, with thoughts of ugly, cheap-looking slabs of plastic that are best left in the 1970s. That was true then, but now things couldn’t be more different. Modern vinyl floors are thick and so soft and squishy underfoot, far warmer to walk on than tiles, and if you drop something it has a chance of remaining intact. It’s quick to lay (don’t attempt yourself though unless you know what you’re doing as one wrong cut can ruin the whole piece), easy to clean and comes in some really lovely finishes. As well as those more traditional ones that look like wood and tiles, modern versions also resemble concrete or stone, and there’s lots of fab funky patterns with raised circles, stripes or squiggles too. The manufacturing and printing process is now so good that these vinyls really do look amazing, I promise. I have styled lots of shoots for Leoline and Avenue floors (see lots here and a few below) and I’ve seen and felt the products personally so I’m not writing this blind! One in particular was …

Ever considered coloured grout?

    Most tile grout is white, but have you considered something different? White metro tiles like these lovely ones from British Ceramic Tile are just what you want – classic, shiny and gorgeous and would look great in any setting but the brick style design would be lost if the grout matched. BCT asked me to create a rather unusual shot that makes you look again at a white tiles so I added eye-catching turquoise grout which outlines the glossy tiles beautifully and is far more fun than boring old white, don’t you think? Another gorgeous version is to use deep charcoal grey which gives a crisp and modern finish (oh and won’t show dirt either – bonus!) Lovely 🙂 

Brilliant plaster to get you organised

Piles of paperwork are an irritation for many of us – mine tend to pile up at the end of the kitchen worktop until I am forced to deal with it.  Imagine having a big area – a whole wall – that would work like a giant magnet memo board where everything is visible and reachable. This is now possible with the very clever new magnetic plaster by British Gypsum – simply have a skim put over current plaster (or on new plasterboard of course) and paint or wallpaper on top so it looks the same as all the other walls. Use magnets to hold paperwork, or kids drawings, or anything you like in place. It would also be wonderful as an easy-to-update photo wall by printing out Instagram pics and changing them whenever the whim takes you. This is the image I created for British Gypsum of a way of using their plaster in a home office setting. Oh so pretty in on-trend pastels – I hope you like it! Image by Lizzie Orme